

This half term, Annabel and I have revisited our favourite Halloween activities… we hope you enjoy them!
KITCHEN CAPERS
If, like me, you have a fruit bat on your hands, then these delicious fruity concoctions will go down a treat and even if your little ones are not so keen on fruit, these are bound to get them excited to give some new things a go.

Clementine pumpkins - Draw little faces on clementines with black Sharpies to create fun, snack-sized ‘pumpkins’ (to avoid disappointed children, check your pens work before starting this activity - many can’t cope with the oily orange skin). Alternatively, peel the clementines and pop a little stick of celery in the top to create the stalk (I find the tiny parts in the centre of the celery work the best as some of them have little leaves on too). Both of these options go down a treat in my household!
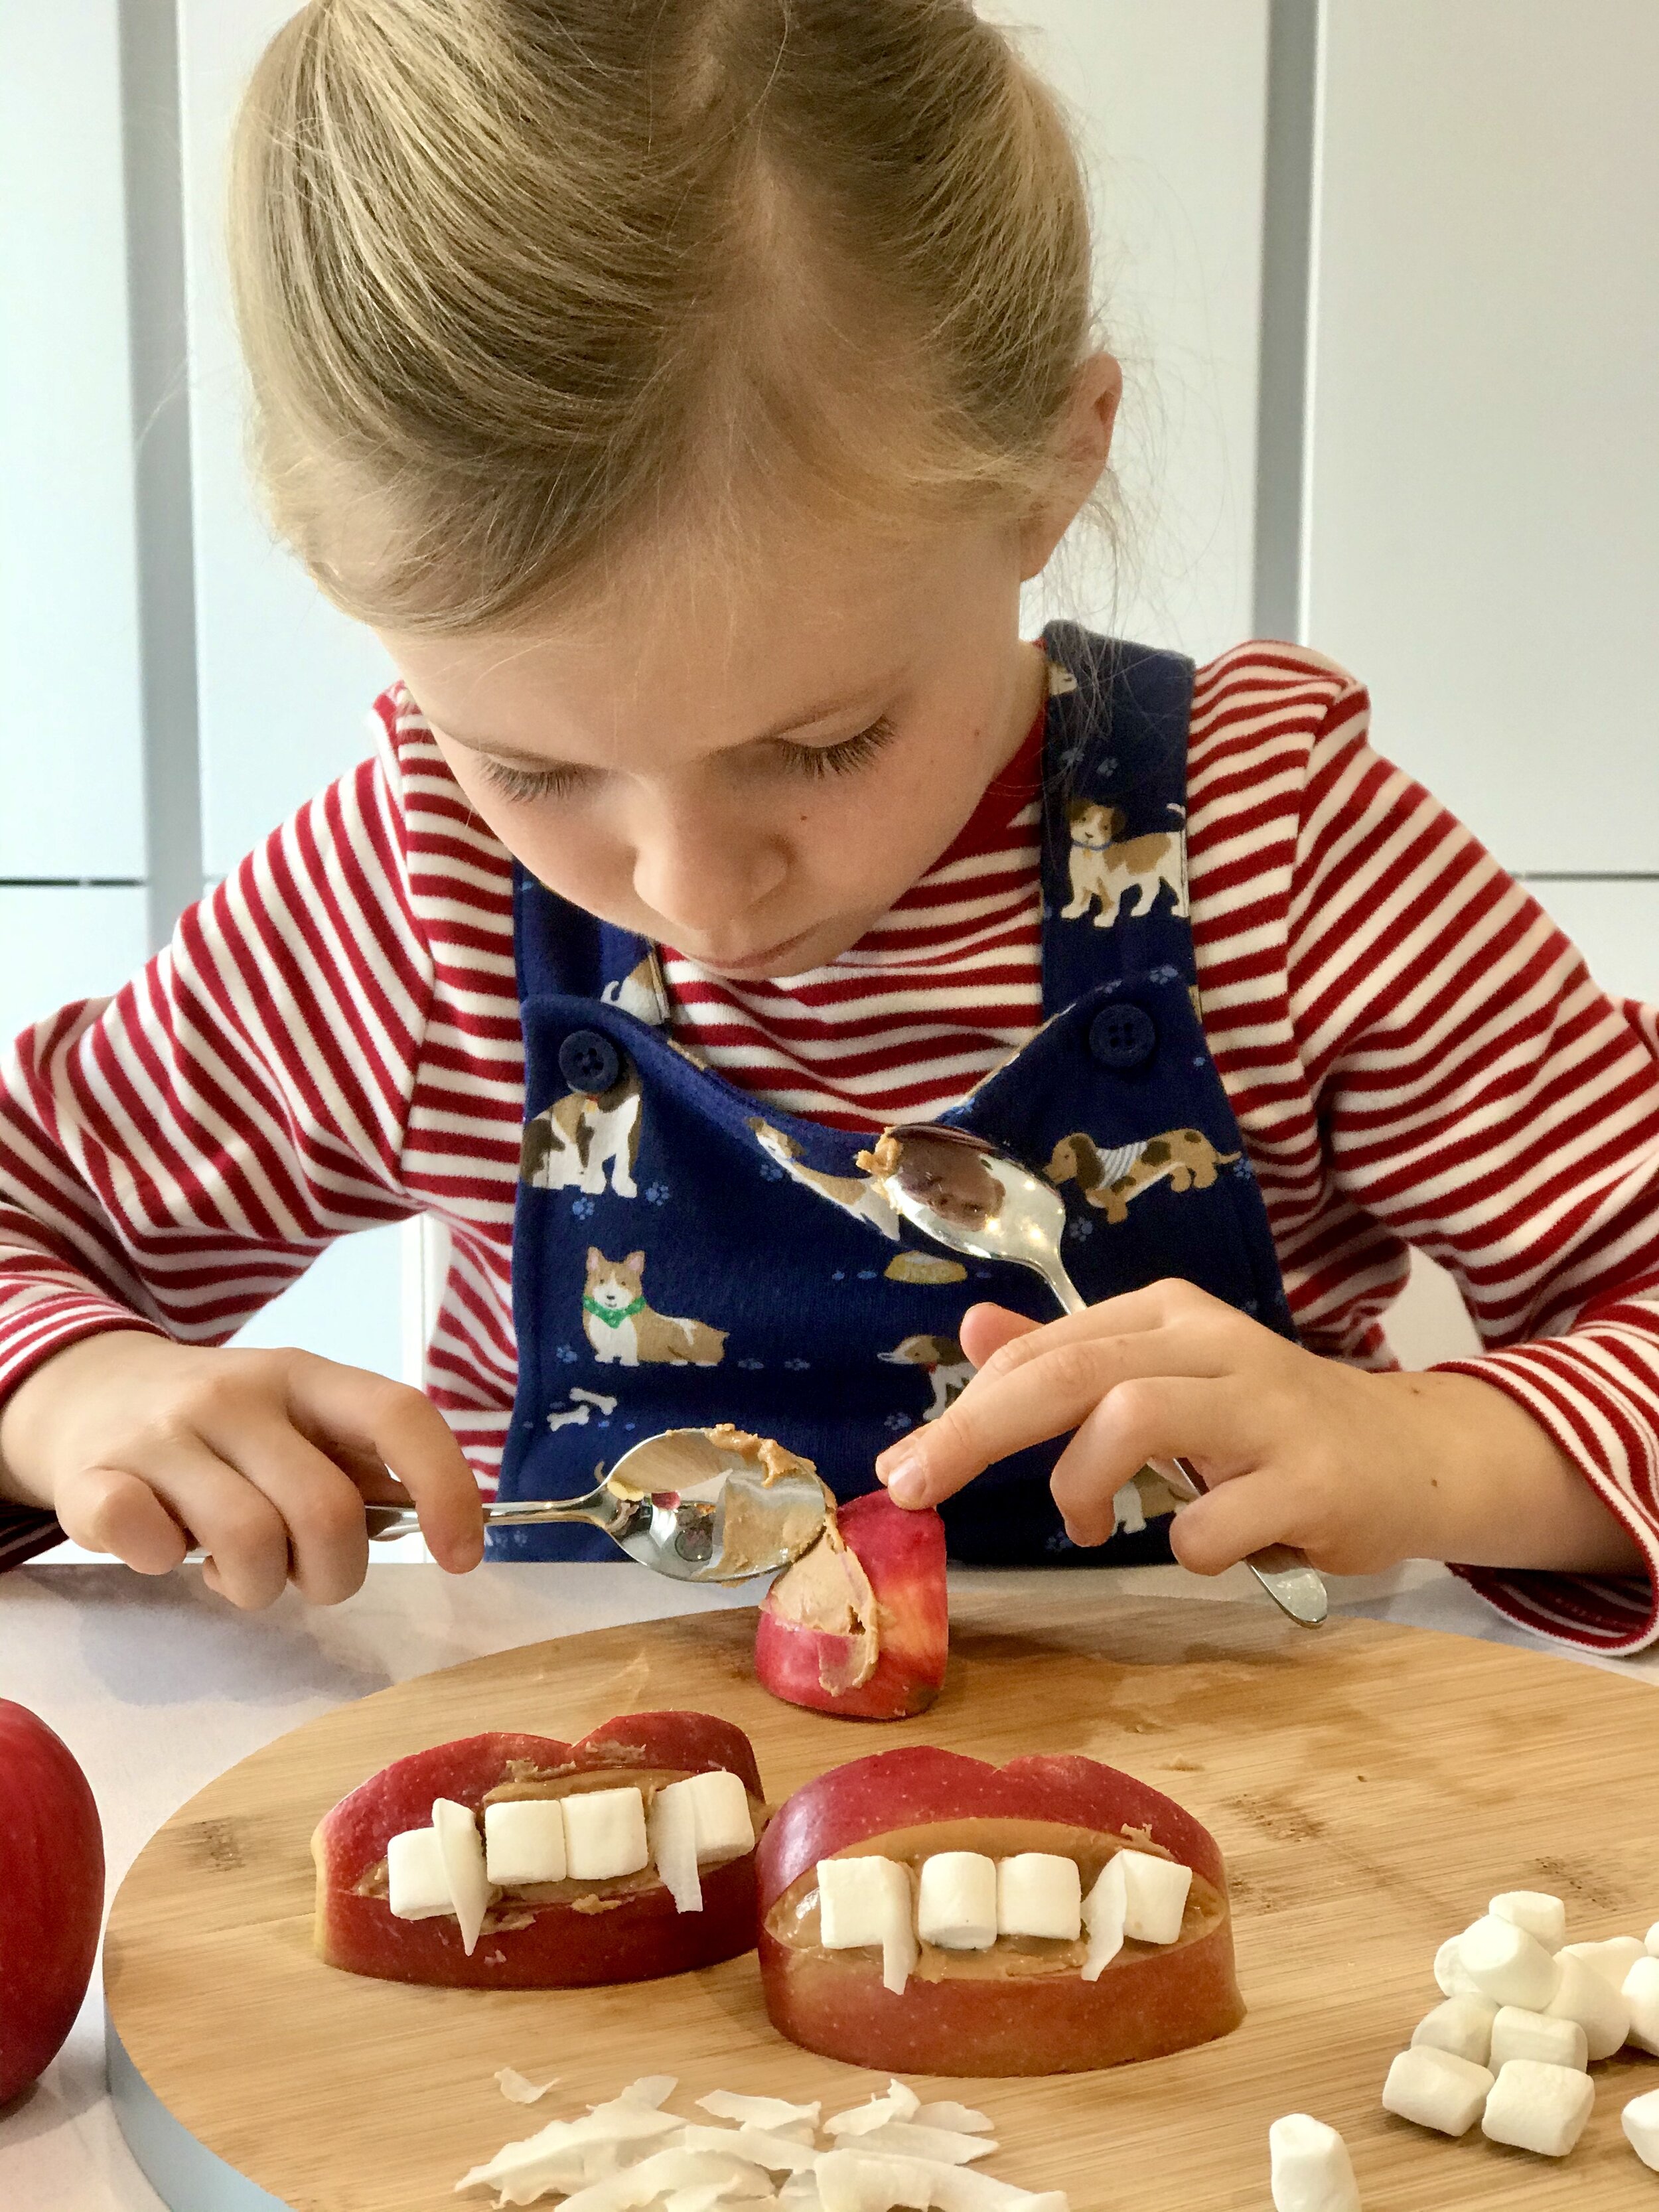
Dracula’s dentures - Slice a red apple into quarters to represent the lips. Then carefully cut out a wedge from the middle of that quarter to form a partially open mouth. Spread about half a teaspoon of peanut butter (or jam if you prefer) into the gap and line up small marshmallows as teeth. We then added some flakes of shaved coconut for vampire fangs!
Ghostly bananas - cut a peeled banana in half, then again lengthways (so that you have quarters that will sit flat on the plate) and pipe two small dots and one larger dot of chocolate (or even easier, use a tube of writing chocolate) to make eyes and an open mouth. Alternatively, if you or older children are making these, leave the bananas in half pieces and serve them ‘standing up’ for added drama on your table.
Mummy Marshmallows - Use food colouring pens to draw lines of bandages across large white marshmallows for delicious Egyptian mummies - don’t forget to include some eyes peeping out! These can either be drawn on, or dip edible eyes into icing or melted chocolate and stick on the marshmallow.
Spooky kebabs - Slide fruit onto skewers and alternative with a few of the mummy marshmallows.
Some more delicious ideas to try…
Pumpkin Quesadillas - Cut a pumpkin style face into a tortilla - this can be as simple as two triangles for eyes and a zig zag for the mouth (I find it easiest to fold the tortilla and use kitchen scissors rather than a knife to do this). Spread tomato puree onto a second tortilla and add a grated or sliced cheese (Red Leicester looks particularly good as the orange colour is most like a pumpkin). Put the face on top and place under the grill for a few minutes to melt the cheese. Yum!

Monster Pizza Bites - Use a circular cookie cutter to cut small disks out of a pizza before this goes into the oven. Add slices of olive for eyes. So simple and lots of trimmings left for nibbling!
Puking Pumpkin - Not surprisingly, the children seem to find this particularly amusing! Cut a large mouth towards the bottom of a small pumpkin and scoop out the seeds. Carve eyes and a nose with a sharp knife or alternatively use a black felt tip to draw them on (much easier for children to do). Place the pumpkin on the edge of a plate, and spoon a dip into the mouth and spread onto the plate. Guacamole is great for this. You can serve with vegetable sticks or tortilla crisps.
For more spookily good ideas, visit BBC Good Food. (Halloween punch anyone?!)

Chocolate crispie cakes - the most versatile of all children’s treats, we gave these a simple halloween twist with some themed cupcake cases and decorations on cocktail sticks (there are similar options at Sainsburys or Asda). These are easy treats to make with young children as they are so quick to make and, as they don’t contain any egg, they are also perfect for those of us (young or not so young!) who can’t resist licking out the bowl!
Melt 150g chocolate in a bowl over a pan of simmering water.
Add 100g butter and 4 tablespoons (or 4 big squeezes) of golden syrup and stir until it is smooth. (It is best for an adult to do this part, but get your child involved with weighing and measuring out the ingredients).
Now take it off the heat and pour over approximately 100g rice crispies (I recommend adding the chocolate to the crispies rather than the other way around as then the hot bowl used for melting can be discarded).
Your little one can stir it all together until the rice crispies are all completely covered in the chocolate mix. (Placing the bowl on top of a tea towel will help to stop it from spinning or slipping as they stir.)
Place 9 - 12 cupcake paper cases in a muffin tin to help the cakes hold their shape, and divide the mixture evenly between them. Leave them to set in the fridge for at least an hour.
Add a few pumpkin fairy lights and you’ve got an impressive desert and very happy children with minimum effort!

Halloween Biscuits - There were created with a just 6 year old, an 8 year old and a nearly 12 year old, and all three of them managed to create some impressive looking biscuits. I am sure that younger children would have just as much fun, with even more ‘creative’ results!
We found our cutters in Jeremy’s Home Store on Monson Road in Tunbridge Wells.
I often find that biscuits lose their shape in the oven (or is that just me?!). Usually what goes in looking like a bat comes out looking like a sausage. These particular biscuits worked perfectly though, so perhaps it’s all in the recipe? Of the two flavours suggested in the recipe, we opted for vanilla as we were out of lemons (- too many g&t’s perhaps?!). I think that the lemon version would have suited the halloween theme far better - you could then add some lemon juice to the icing to give a really zesty kick.
For the decorations, we raided the baking cupboard: simple icing sugar and water for the ghosts, an additional squeeze of orange colouring for the pumpkins, and melted chocolate for the bats (as I didn’t have any cooking chocolate, these bats are very decadently made with Lindt dark salted caramel choccie instead!). We tried out icing pens for the writing, added the eyes that we’d used earlier for the Mummy Marshmallows (see above) and some gold sprinkles to add texture to the pumpkins. We also gave some a gold shimmer with edible glitter spray (- we’ve discovered none of us are particularly keen on the taste though, so use with caution!)

Oreo creatures
This have been an enormous hit as they are both delicious treats and incredibly easy to make.
Bat:
Gently twist the two biscuit halves of the Oreo to open it up.
The creamy filling tends to adhere to one side more the other, so choose the cleanest side and gently cut it in two to form the wings
Stick these back onto the bottom half of the biscuit
Add Edible Eyes (you could also use raisins)
Spider:
Gently twist the two biscuit halves of the Oreo to open it up.
Use MatchMakers chocolates for the legs - one ‘match’ can make 4 legs.
Place 8 legs onto the creamy filling of the Oreo and pop the lid back on.
We added some optional fangs (which were actually unicorn horns from a Crazy Faces packet)


Little Monsters
These Babybel monsters are so quick and easy - simply peel the central tab all the way around and remove. Using a sharp knife, cut little teeth out of the wax and add slices of olives for eyes.
For the apple monsters, cut an apple into quarters and core (try not to cut too much away otherwise your monster will fall backwards). Cut a section from the front - save this part and fashion a little tongue. Fill with jam or peanut butter and pop the apple tongue in place. Press raisins into two slices of banana (slightly underripe is best) and fix in place with cocktail sticks. These are really fun to eat!

Much like the monsters above, this disgusting looking creation started life as a section of apple. Having removed the core and carved a hole in the front, I filled it with peanut better and popped in some pine nuts for teeth. Some edible eyes stuck on with peanut butter finishes the look.
TRICK OR TREATING
If you have little ones that are not keen on the dark or need an earlier bedtime, here are some ideas that you could try at home any time over half term or during daylight hours on Halloween itself

Pumpkin hunt - encourage your child to spot houses which have got a pumpkin on display. For every one they spot, pop a sweet from your own stash into their bucket.
Scavenger hunt - set your child the challenge of finding all of the items on a list (things like: a cat, a happy pumpkin, a pile of leaves, a spiderweb, coloured lights etc) - they can tick them off as they walk around your street… ticking off their list will be extra fun by torchlight! If you have older children, you can make the list trickier (or more amusing!) by requiring them to find multiple examples of each or adding a challenge with each item: for example, when you see a cat, meow three times; when you find a carved pumpkin make exactly the same expression and take a selfie)
Anagram challenge - you could do this around your home or, if you have a close-knit community, give each participating household a letter to display. How they do this is entirely up to them: they could pop it into a lit up window, nestle it amongst a pumpkin display by the door or - for those who’d like to get involved in the fun and have an excuse to dress up too - pop a sign up on the door saying ‘ring for clue’. Provide your child with a spooky riddle - the answer to which can be uncovered by finding and unscrambling all of the hidden letters. Whether they deserve a trick or a treat for deducing the answer is up to you!
Riddles:
I have no feet to dance, I have no eyes to see, I have no life to live or die but yet I do all three. What am I? Answer: FIRE (these are the letters that you would hide and your children would then unscramble to solve the riddle)
I’m tall when I’m young, I’m short when I’m old, and once a year, I make heavy pumpkins light. What am I? Answer: A CANDLE (these are the letters that you would hide and your children would then unscramble to solve the riddle)
Frankenstein’s father has three sons. The names of two of them are Snap and Crackle. What is the third son called? Answer: Frankenstein.
CREEPY CRAFTING
Rainbow bats

This cute and colourful bats from Hello Wonderful are so effective, but amazingly simple to make. We don’t get huge numbers of Trick or Treaters where we live, so we decided to make some and fill them with chocolates as a real treat for those who visit our home.
Cut a piece of paper to fit a toilet roll. We used origami paper but you could also use construction paper or even wrapping paper. Glue and wrap all the way around.
Draw or stick on eyes.
Cut out two small triangles of white paper and glue on for fangs
Gently fold in the bottom of the tube. Pop some wrapped chocolates or sweets inside and then fold in the top.
Cut out some wings from black paper or thin card - the original design used two separate wings, but we made one piece which made it really easy to glue on afterwards. I recommend you make a paper template by folding a piece of paper in half and drawing on a single wing. When you cut and open it out you’ll have a symmetrical pair.

Monsterous book marks
We loved making the origami bookmarks featured on Easy Peasy and Fun. I’ll let them explain the origami element as they go through it clearly step by step, but here are some design ideas to inspire you…

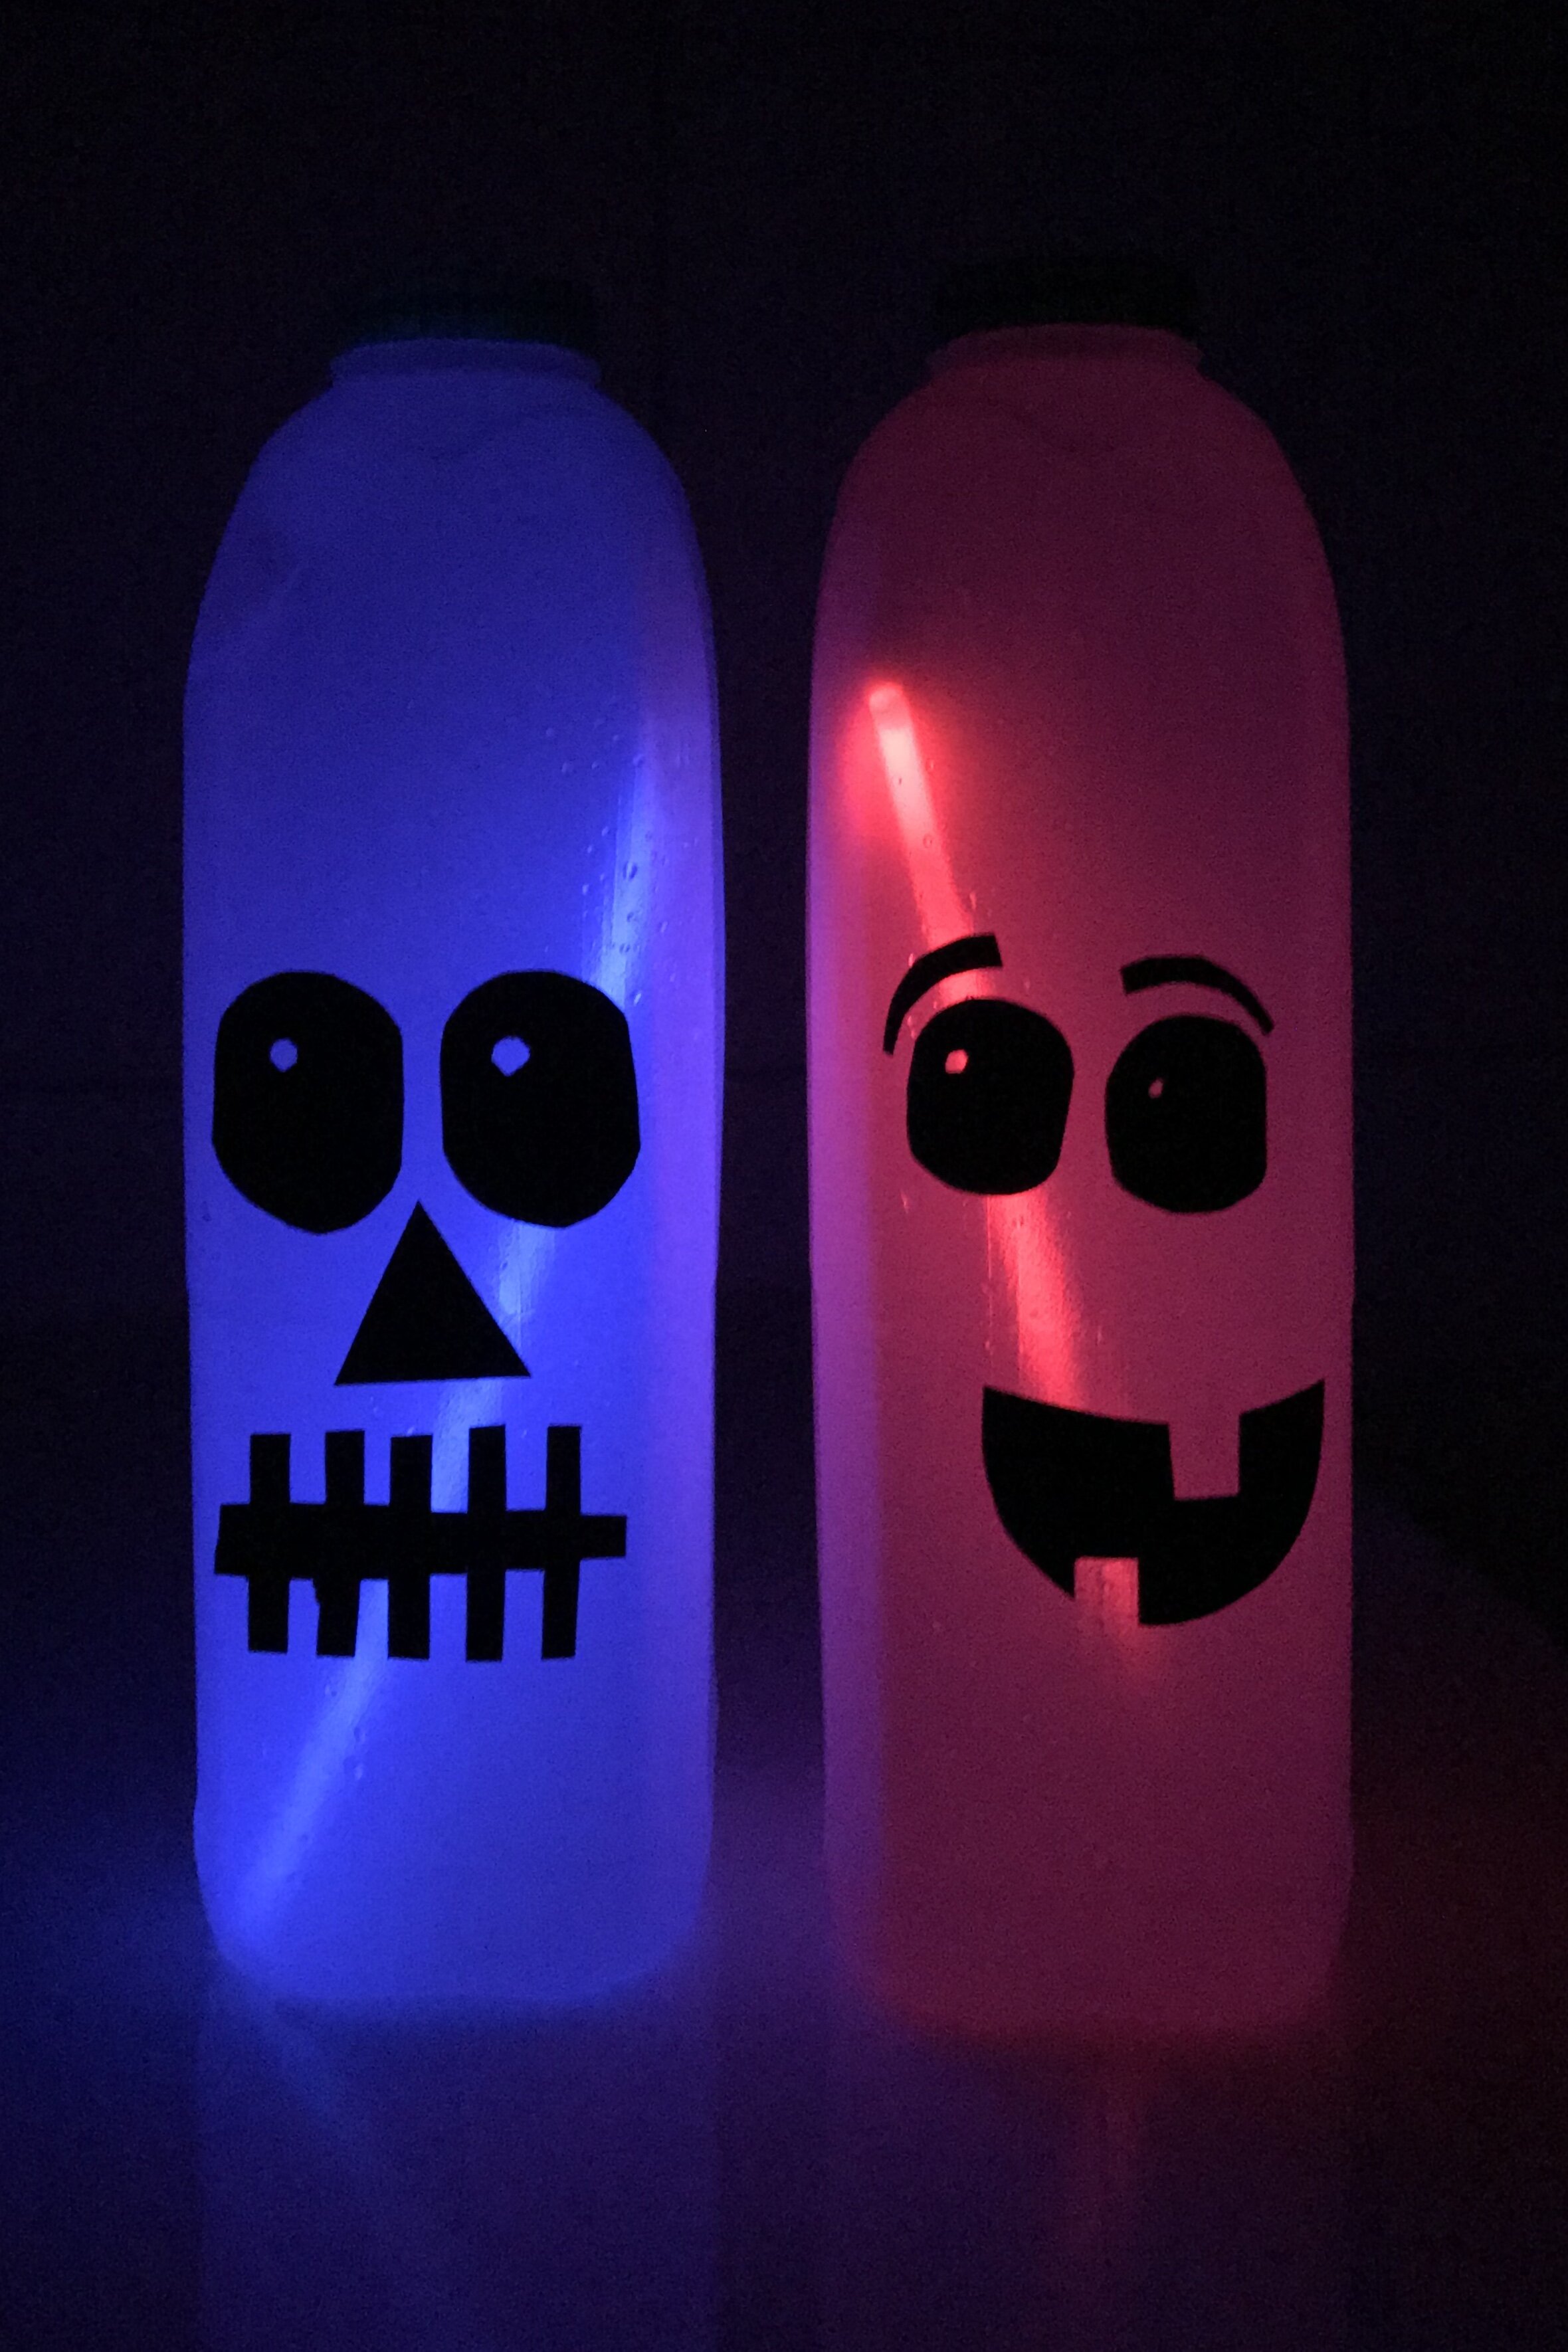
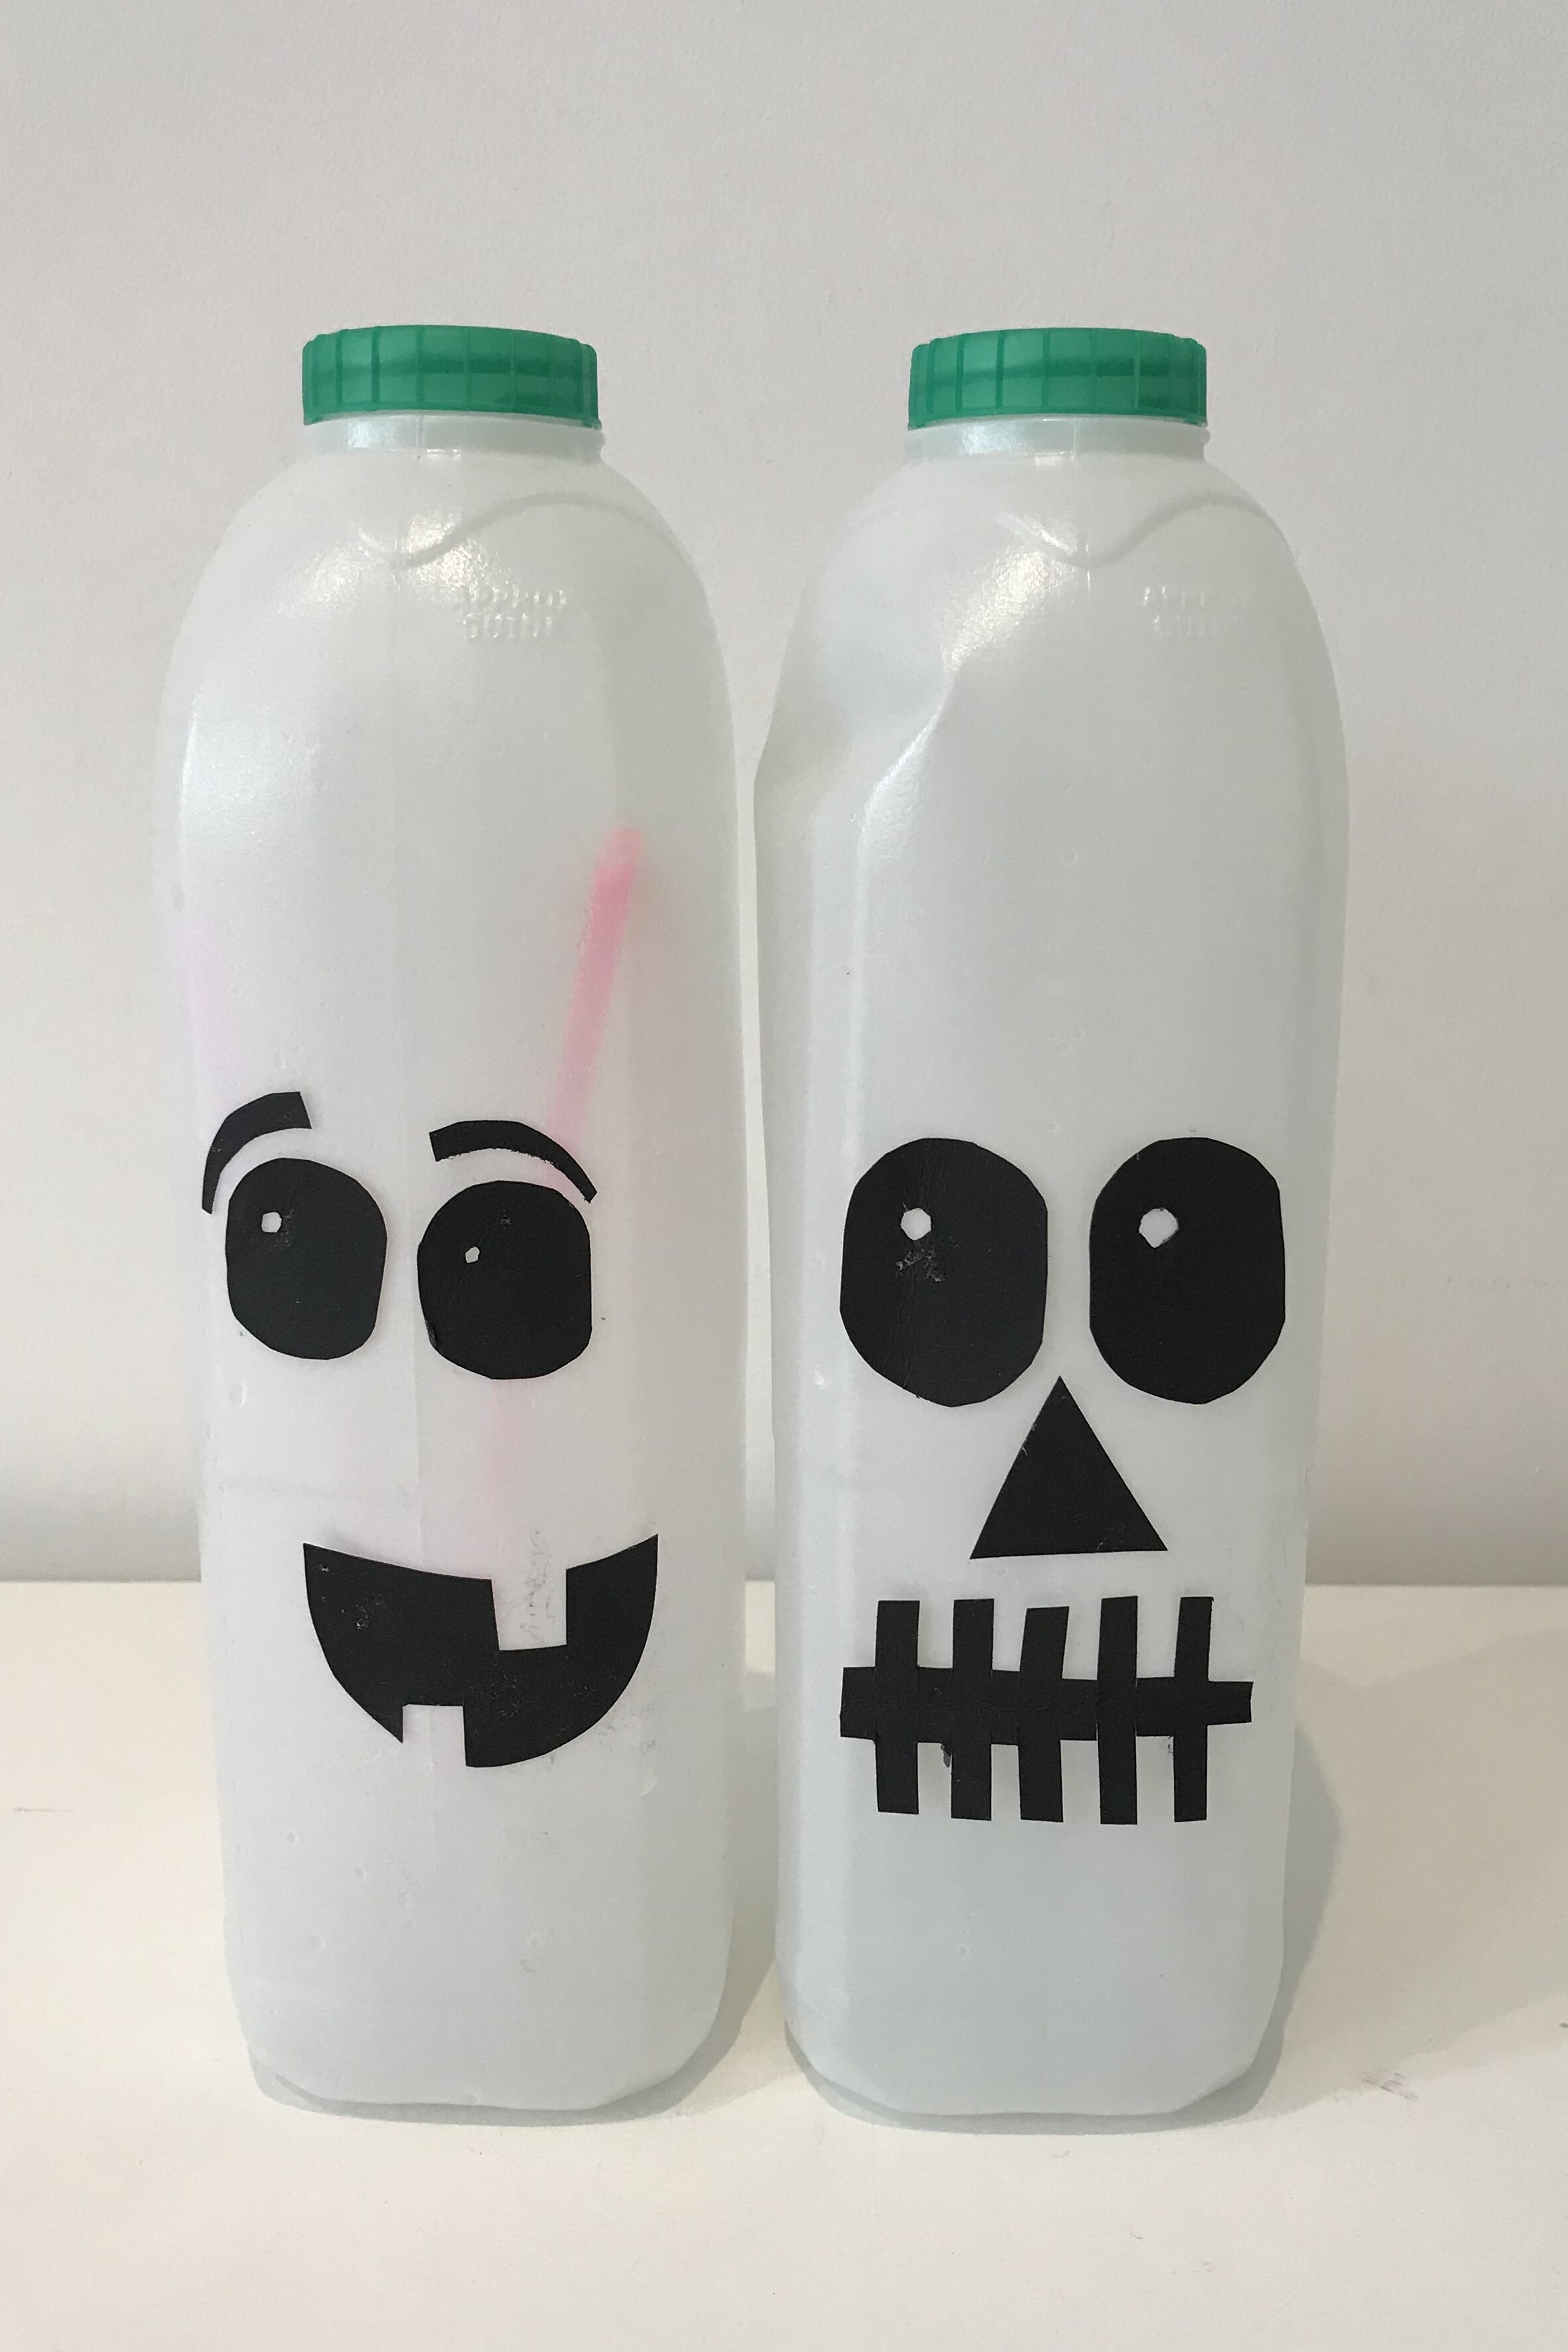
Milk bottle monsters - If, like mine, your household devours milk, then you will have plenty of milk bottles in the recycling box ready to up-cycle into some of these simple lanterns.
We stuck black paper onto the plastic, but you could draw straight onto the bottles with permanent pen, if you prefer. After dark, pop a glow stick inside and see them come to life! These would be fun outside your door or - with their convenient built in handle - could be carried by your little one like a torch as you venture into the dark.
Egyptian Mummies - Cut out a simple person shape from black card and tape the end of a piece of white wool to the back. Your little one will have lots of fun wrapping wool to create the ‘bandages’. Encourage them to go from limb to limb rather than just round and round one place. Sticker eyes finish off the look.
Cotton Wool Ghosts - So simple, yet so effective. Cut a basic ghost shape from white card. We all have different tolerances for mess, so you (or your little one) can either use a glue stick to apply glue to the card and encourage your child to stick the cotton balls on, or fill a shallow dish (a take away container is perfect) with craft glue and let them dip each cotton ball in before sticking it on (it is worth putting down a table cloth and putting on an apron first!). Don’t forget those eyes - stickers or black pen work equally well.
This photo shows what 2 and 3 year olds were able to produce with some guidance at Scallywags parent and toddler group, however, I’ve also made these with older children, who have really enjoyed them too!

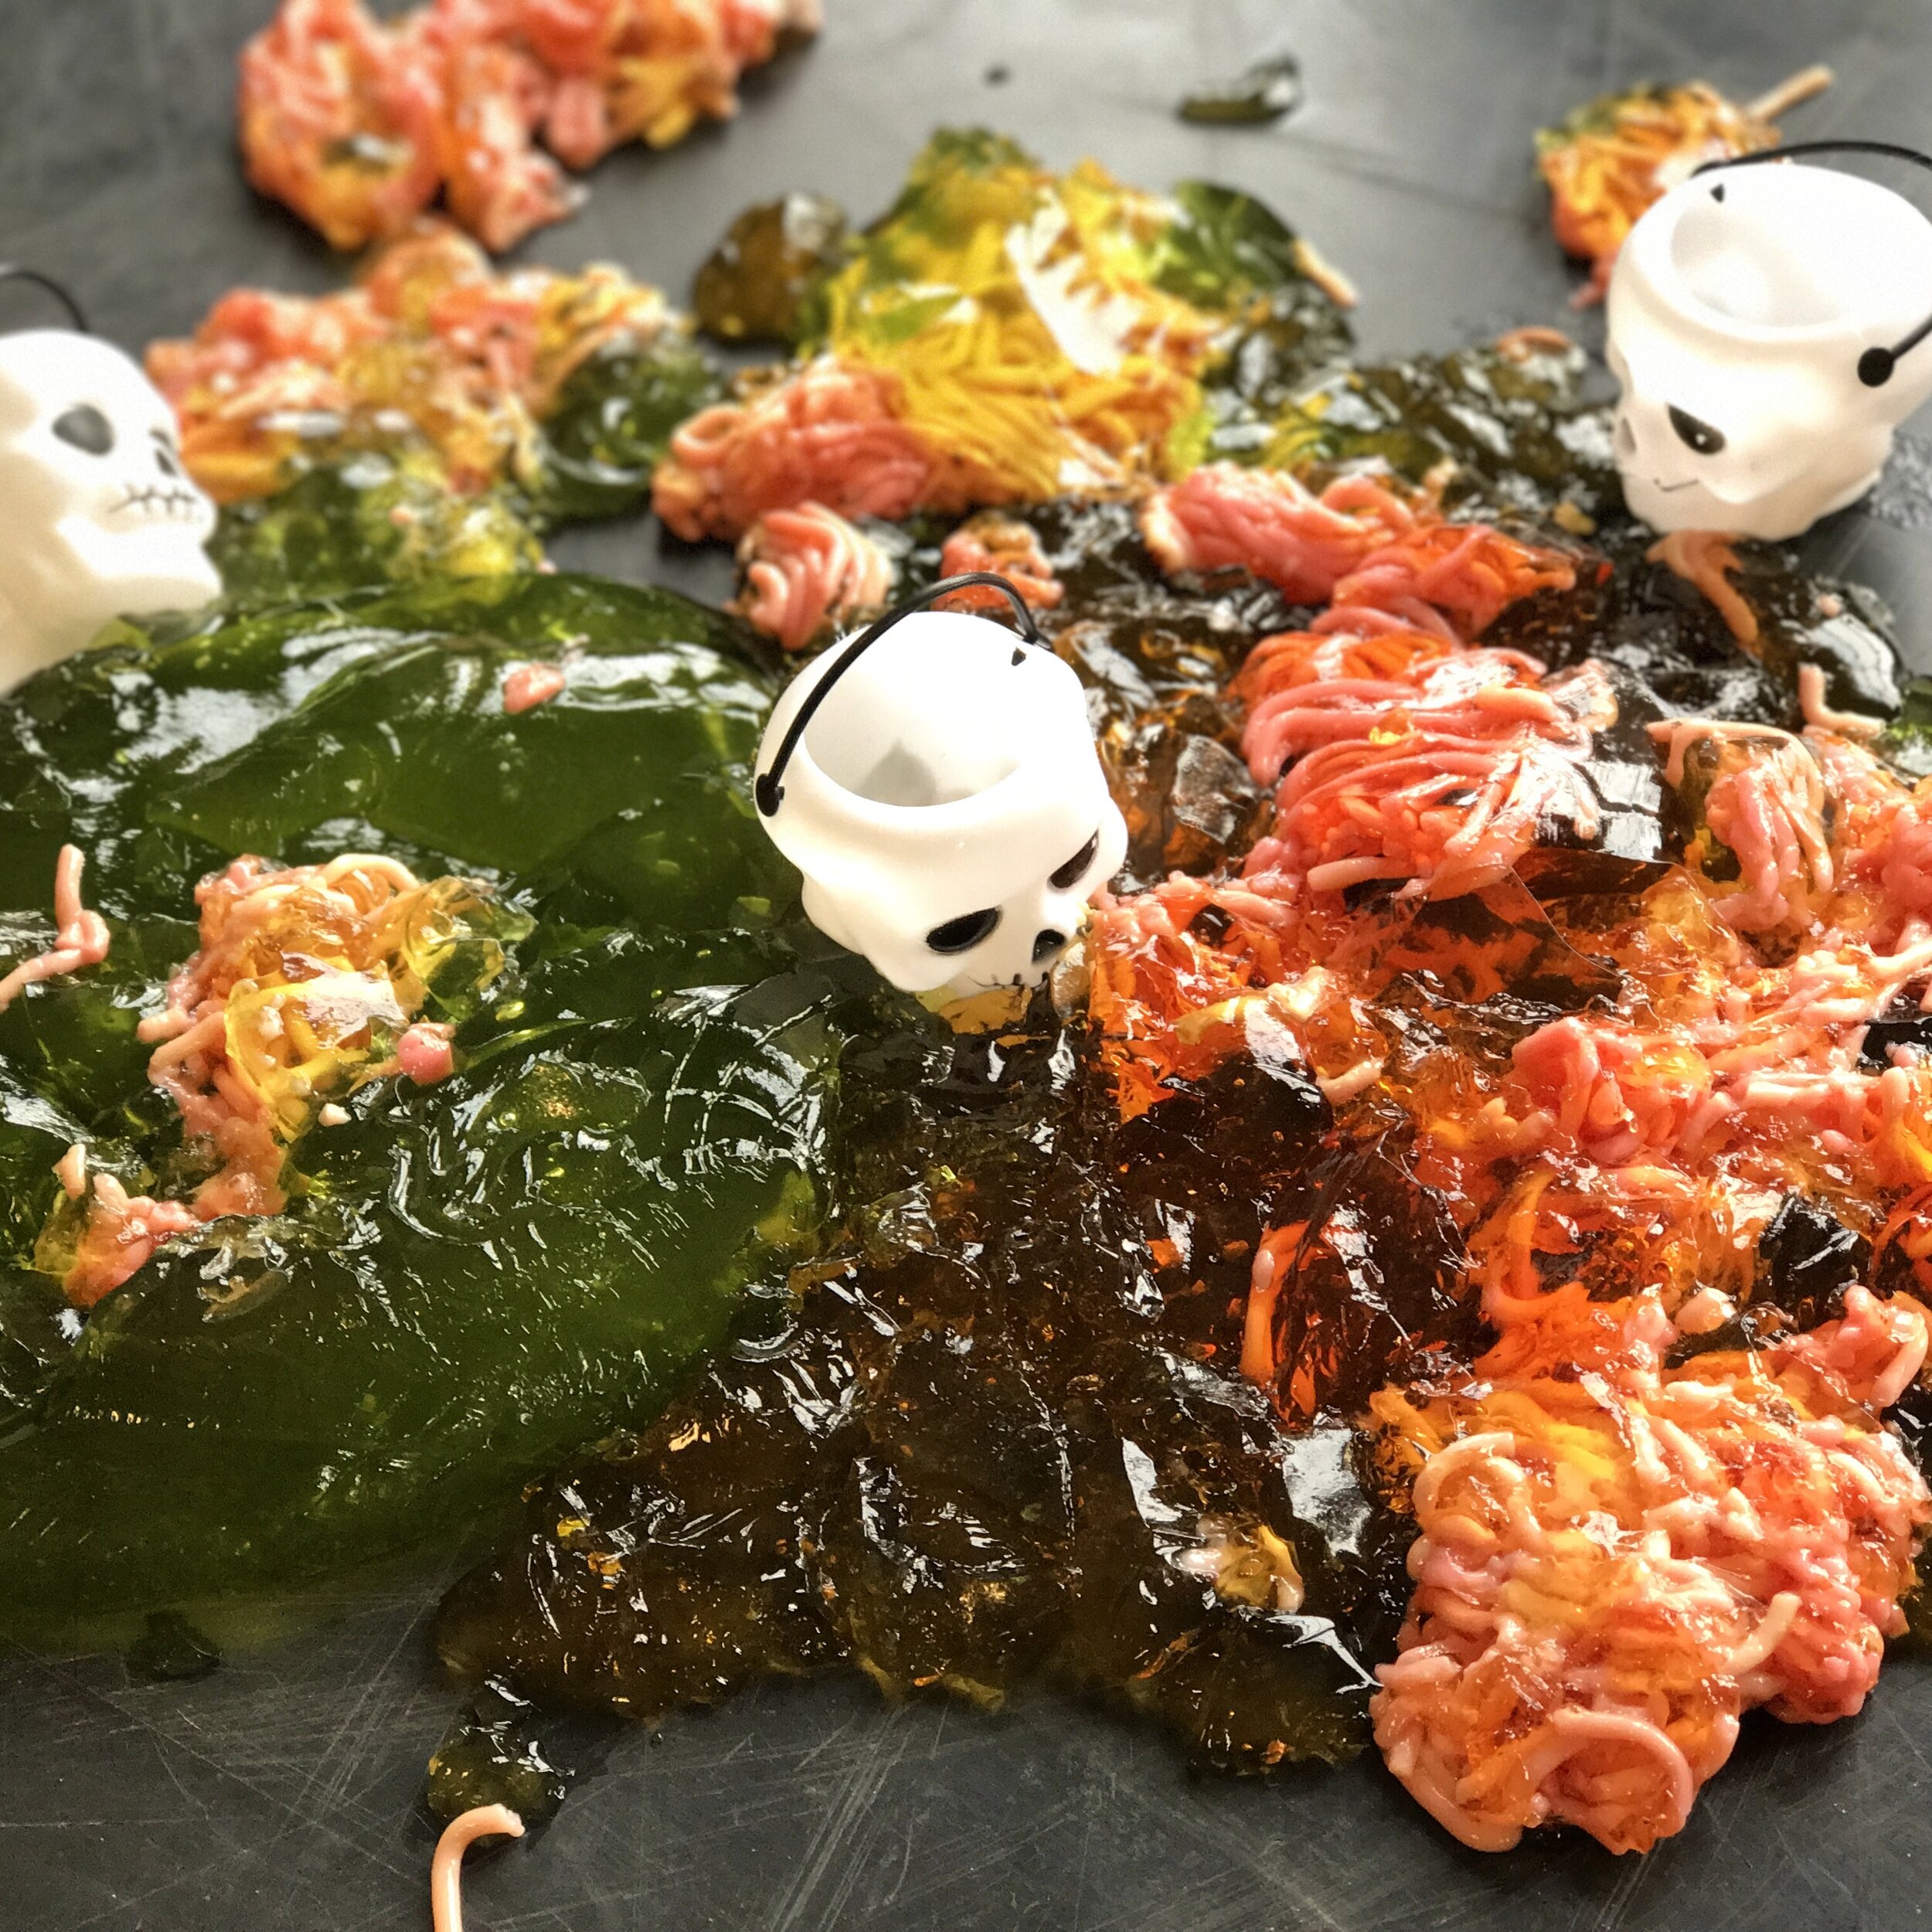
Jelly messy play - This requires a bit of forward planning, but is lots of fun!
Cook some spaghetti and mix into dissolved packet jelly before you allow it all to set in the fridge.
24 hours later, turn the jelly out onto a large tray and let your little one enjoy the sensation of jelly squashing in their hands and through their fingers. If you can embrace the mess, then help them to put their feet in too and experience the delicious sensation of squidgy jelly between their toes! (I recommend you do this on the floor with a large plastic table cloth under the tray, and that you have a towel to hand for afterwards).
We added some plastic skull baskets and spoons so that the children could enjoy scooping some jelly into them - its lots of fun - I challenge you not to squish your hands in too!
Variations:
Jelly rescue - set some small plastic toys into the jelly. Toddlers can then either use their fingers or tongs (which is great for developing fine motor skills) to rescue the toys from their wobbly environment! You can extend this further, by encouraging your toddler to sort the rescued toys into colours.
Number search - pop plastic numbers (or letters) into the jelly and see whether your child can find all the numbers and order them correctly.
CHILLING OUT
Halloween movie night - Curl up with the popcorn and enjoy some family fun (whether you do this in your pjs or full fancy dress is entirely up to you!) Good Housekeeping has 41 suggestions to satisfy everyone’s optimum scare level.
PUMPKINS
Pumpkin picking - I went pumpkin picking for the first time last year and I wish that I’d been before! It was amazing how particular everyone suddenly became about their choice of pumpkin… I discovered each child was making a little collection of their favourite pumpkins from which they made their final (agonising!) choice! It was a good hour of entertainment in the fresh air. My top tip would be head-to-toe waterproofs and wellies as the fields are generally quite muddy, and the pumpkins are pretty dirty too - I can guarantee your little one will wander around lovingly clutching at least one to their chest at some stage!
There are lots of local pumpkin farms to choose from or you can pick up a pumpkin from most local supermarkets.
Pumpkin soup - After all that pumpkin picking, what better activity to follow it up with than making pumpkin soup?
At this time of year, I turn to my well thumbed cook book A Soup For Every Day, produced by the New Covent Garden Soup company. There are so many different recipes… some I haven’t tried, some I really feel l must and some whose pages are now adorned with extra soup splodges as they have been made so many times!
Here is one of my favourite pumpkin recipes from the book - let me know what you think!
Melt 25g butter in a saucepan, add 1 medium diced onion, 1 deseeded, chopped chilli and 2-3 fresh sage leaves, then cook for 10 minutes until softened.
Add 650g pumpkin flesh and sweat for a couple of minutes. Pour in 650ml chicken stock, then cover and simmer for 20-25 minutes.
Meanwhile, fry 100g chorizo (I often use bacon or pancetta instead) and 2 cloves of diced garlic in oil until the chorizo is browned.
Bled the soup, season to taste, then reheat gently, adding the chorizo and garlic (and the oil from the pan).
Enjoy with chunks of crusty bread!
Pumpkin Decorating - As Annabel is now old enough to carve her pumpkin herself, I decided I’d decorate my own in a slightly different way this year…

I opted for a more sophisticated style with a touch of gold leaf! This is actually really easy and even little ones could give it a go. It takes just a few minutes and the results are fabulous!
Paint PVA glue on to the parts of the pumpkin that you intend to be gold. You can buy special guilding adhesive for projects that require precision, but for this style of project PVA is a cheaper, more readily available alternative.
Allow the glue to dry slightly so that it is tacky.
Gently lay a piece of gold leaf onto the glue and press into place. I bought my gold leaf from Amazon, but you can also find it in places like Hobbycraft. Leave this to dry for a few minutes (some recommend overnight, but I’m impatient!)
With a dry brush (definitely not the one you used for the PVA!), gently brush off the excess gold leaf. If you have empty areas, you can place any discarded gold leaf on top and keep pressing and brushing until you are happy with the coverage.
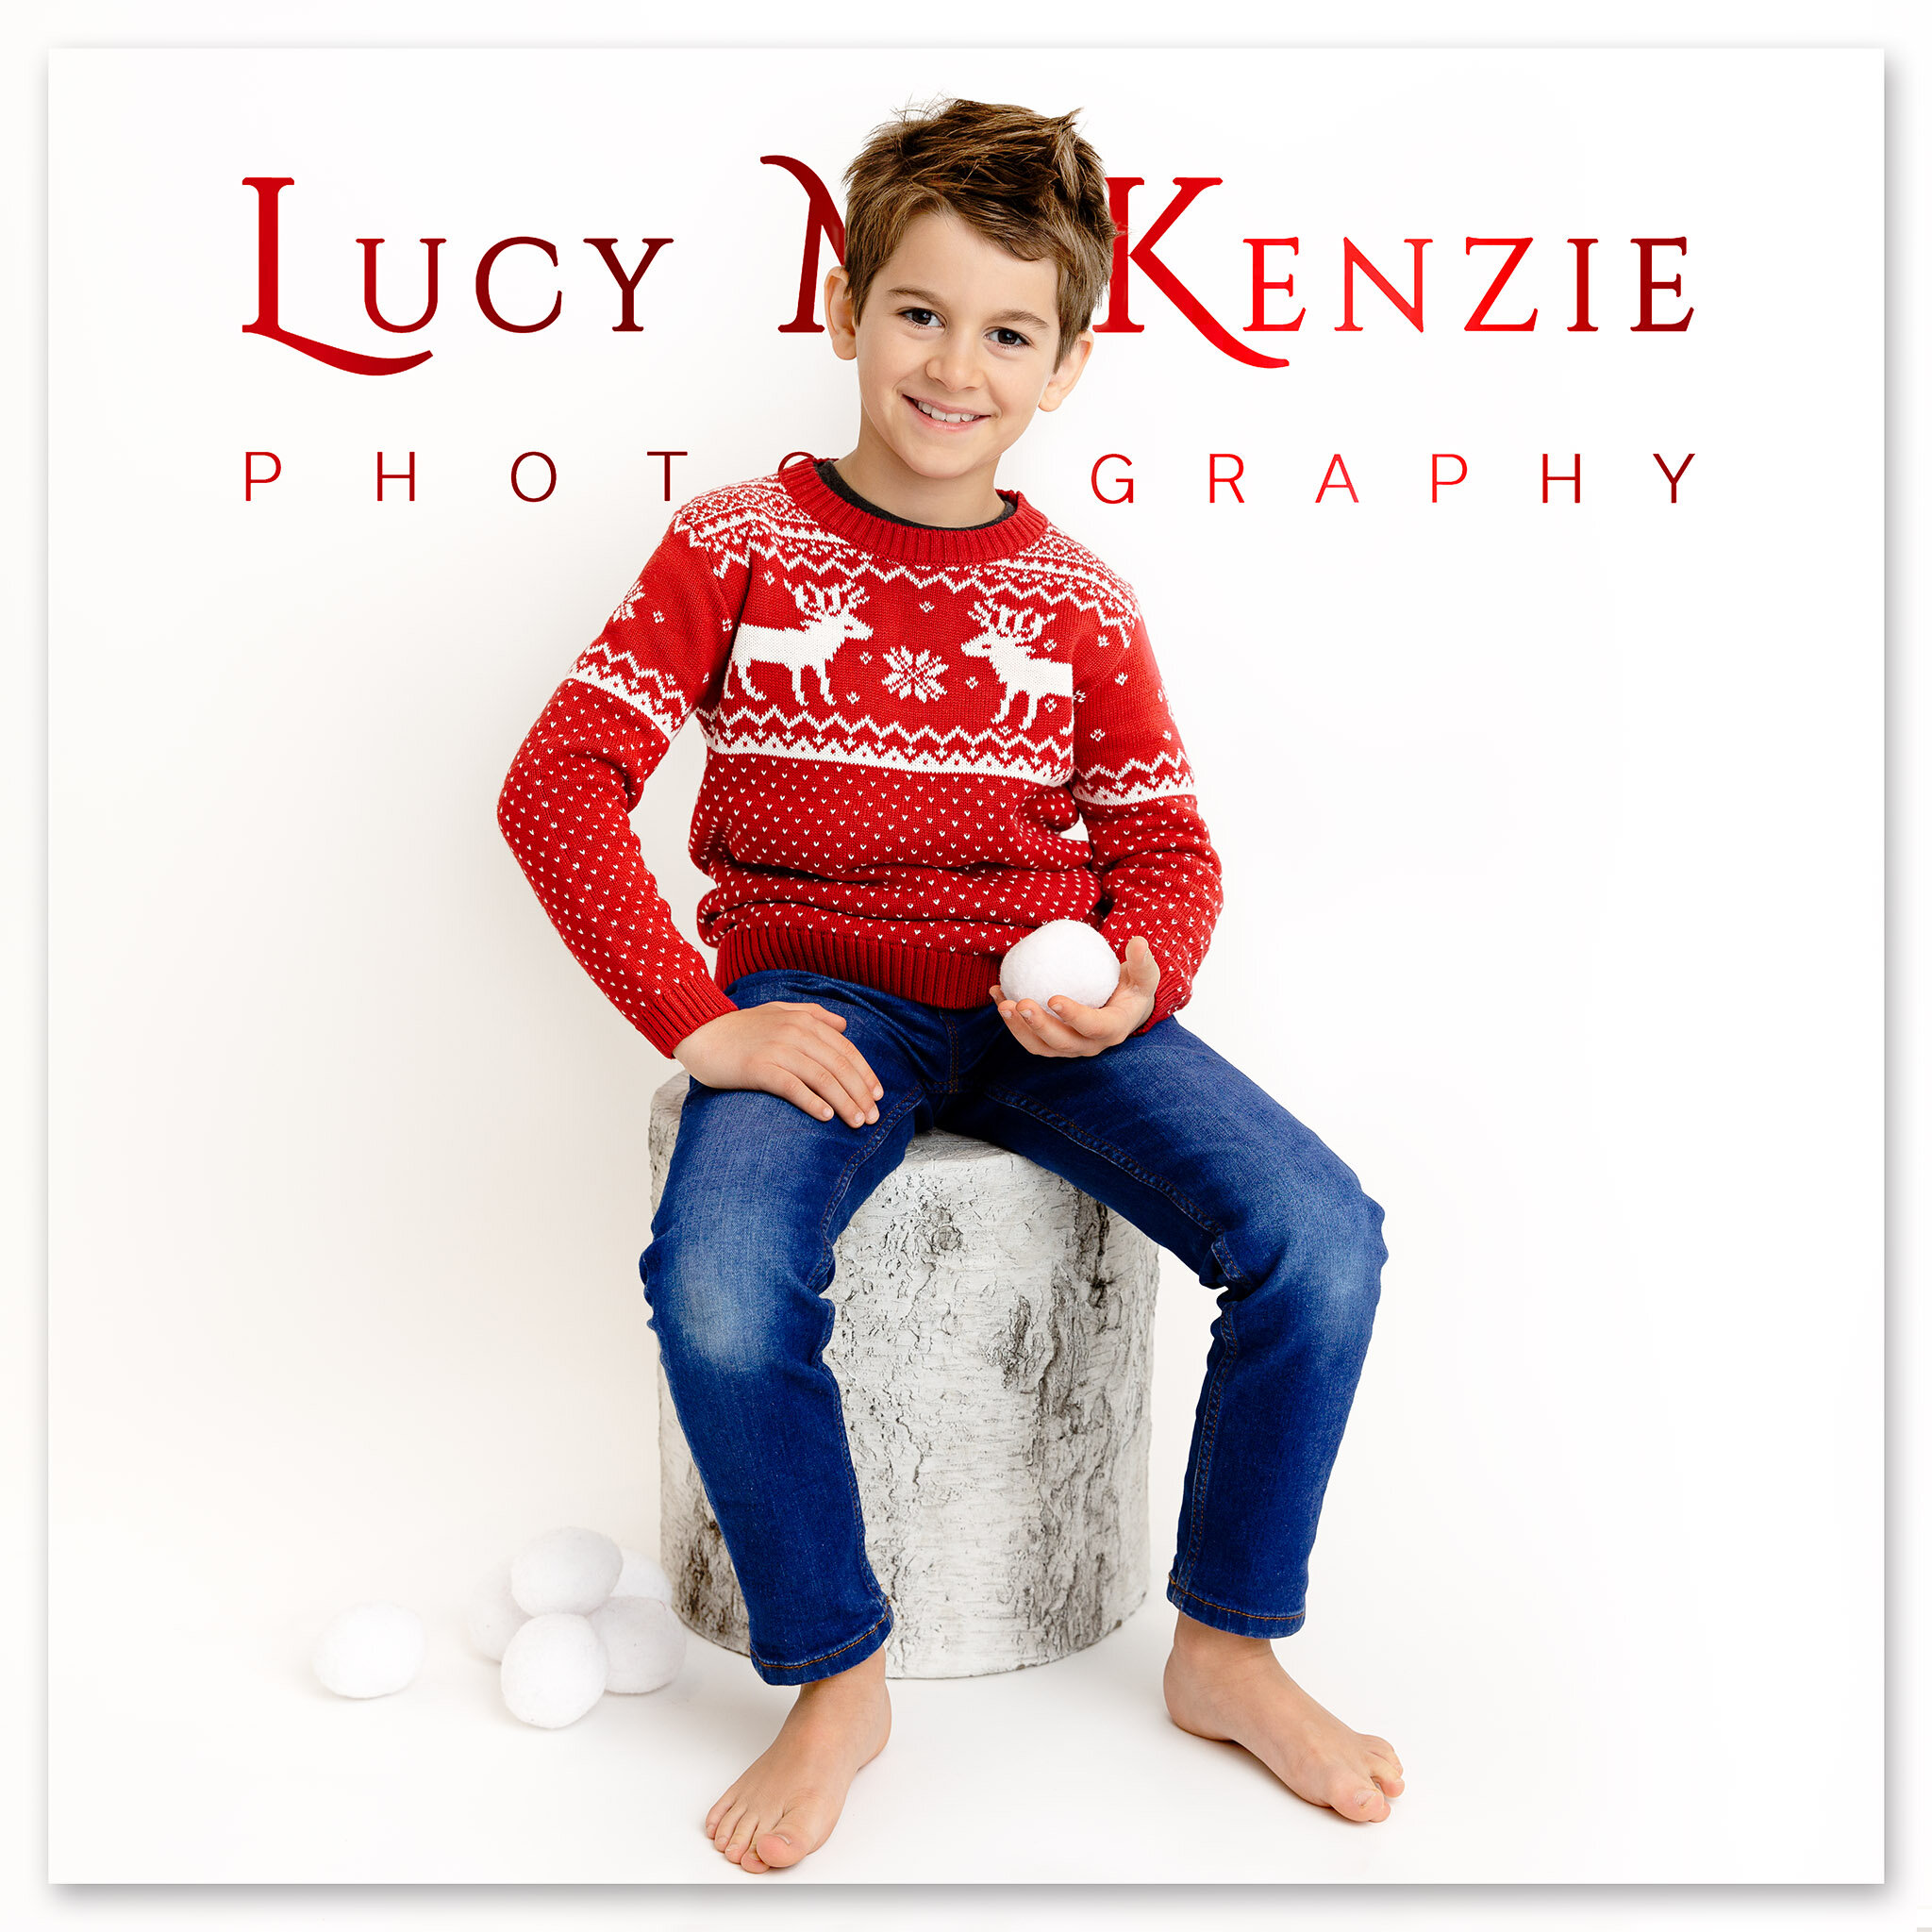
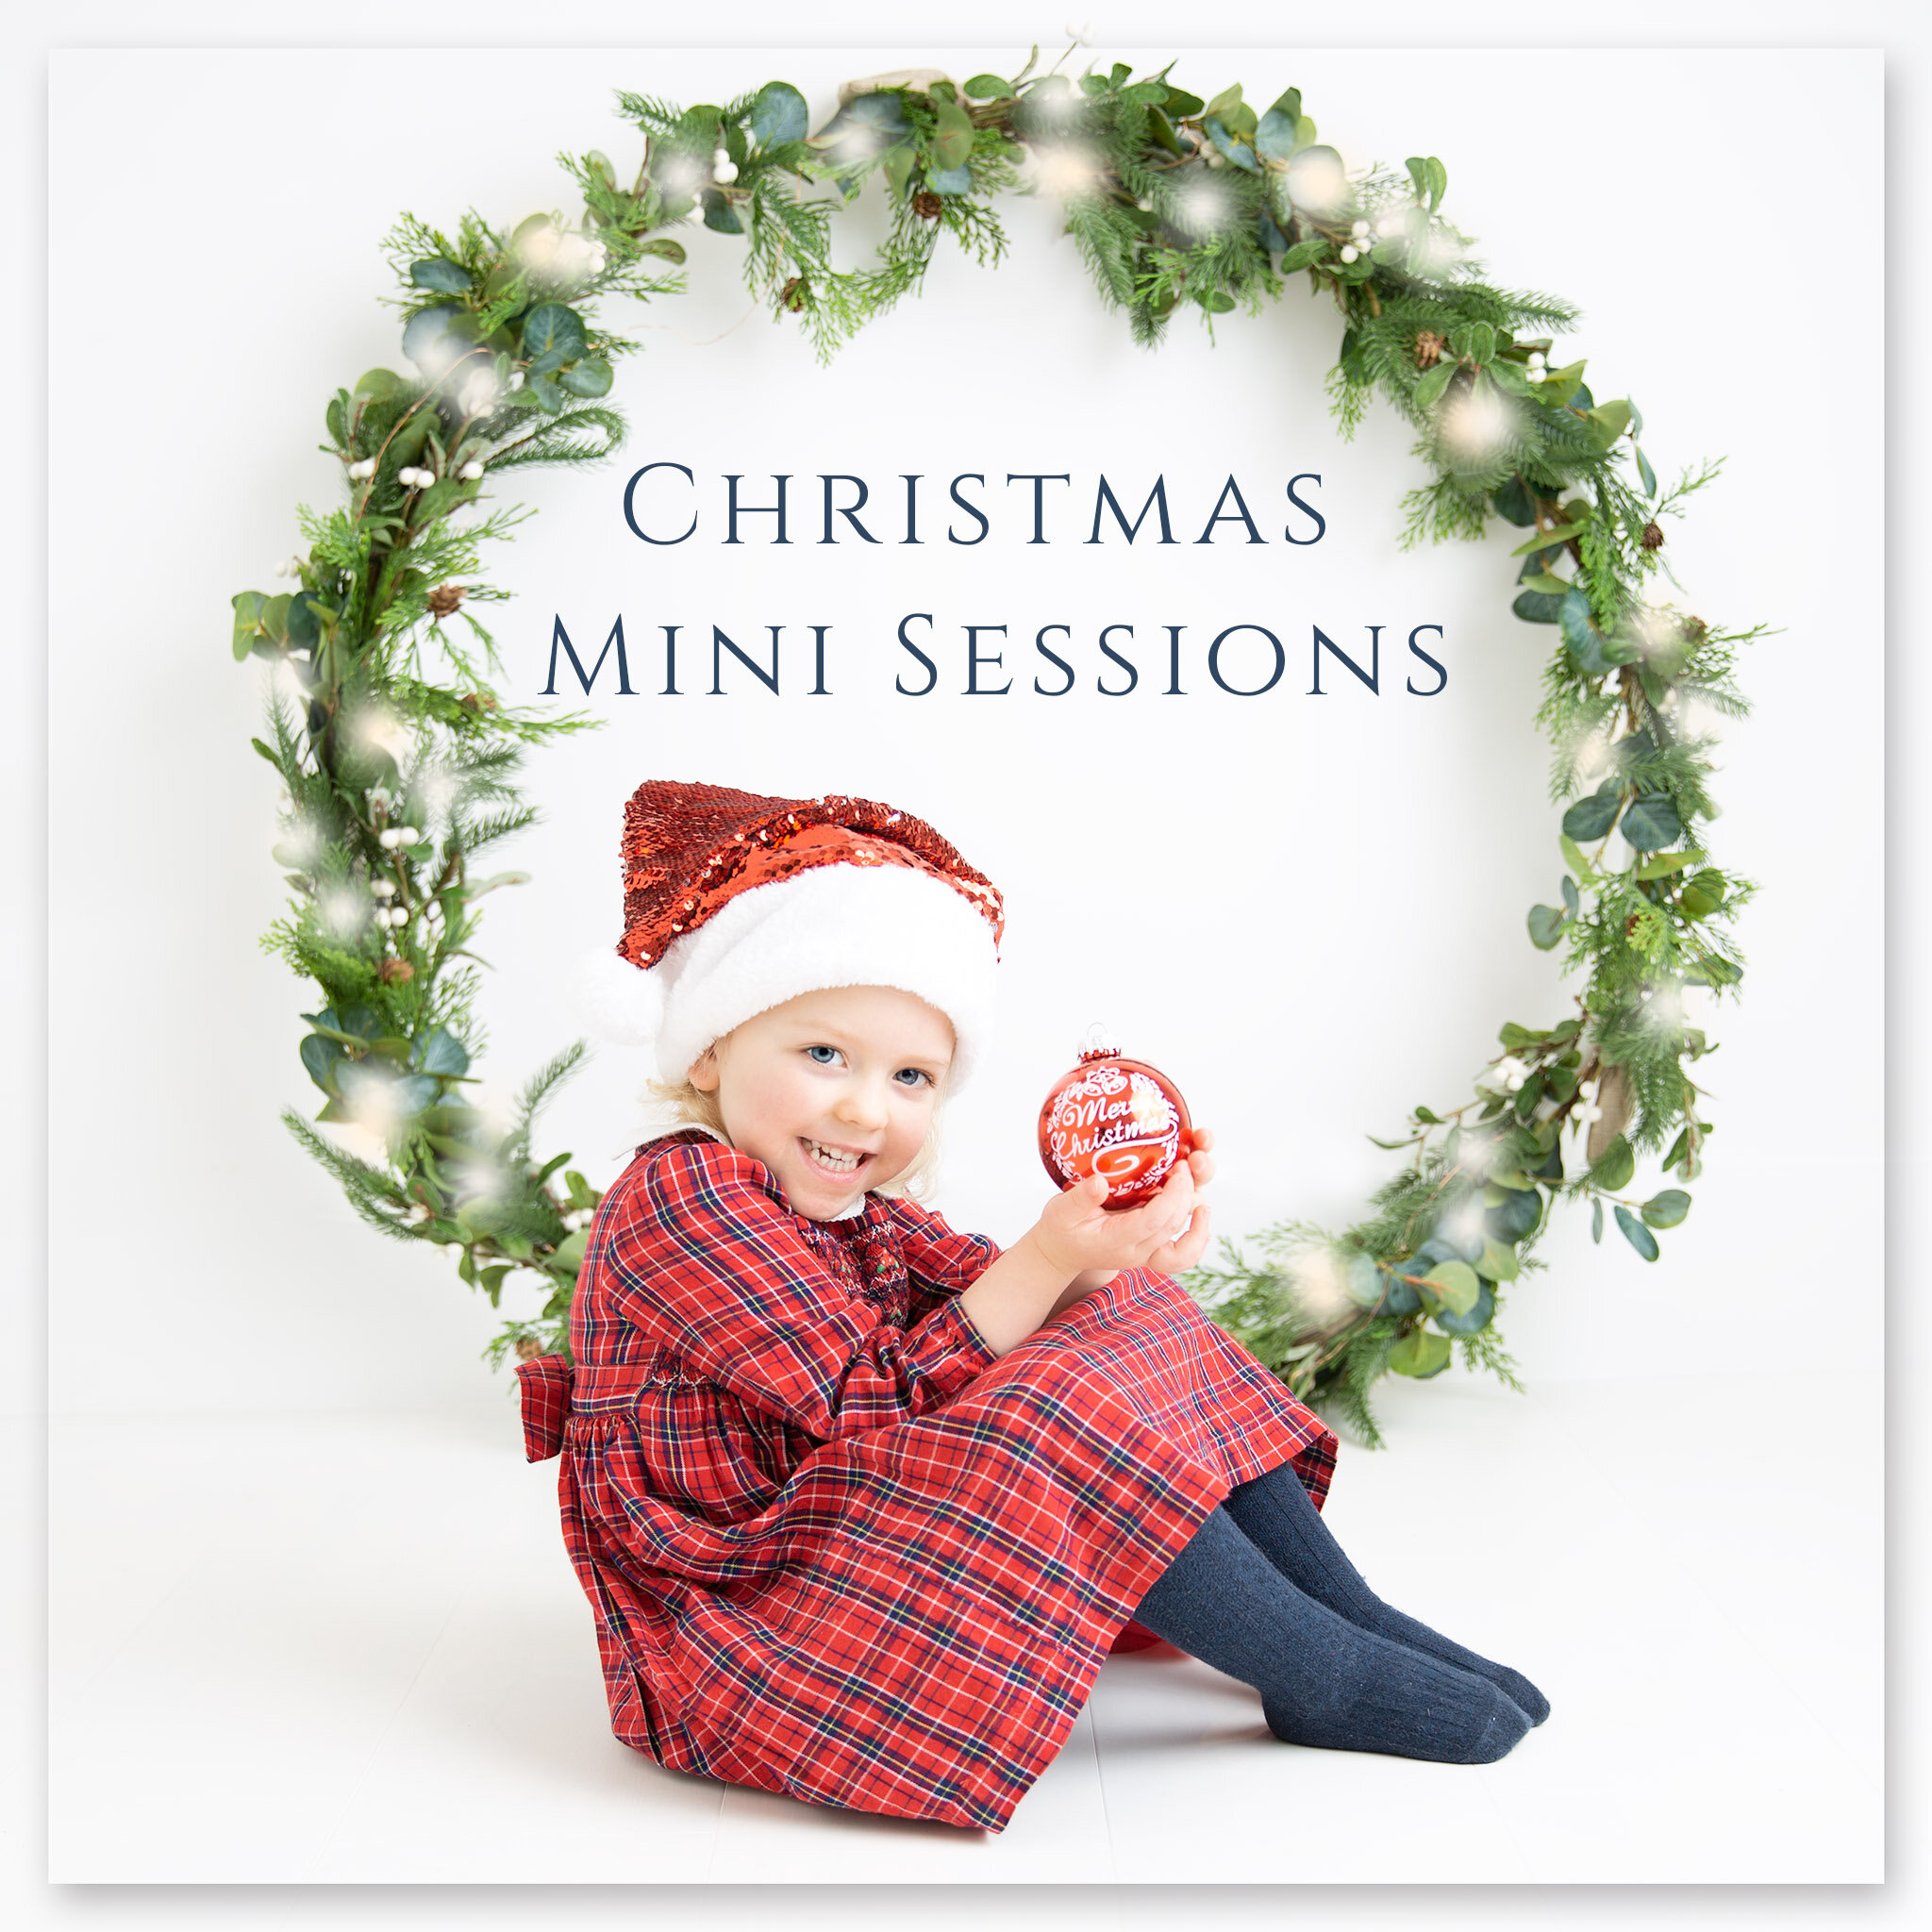
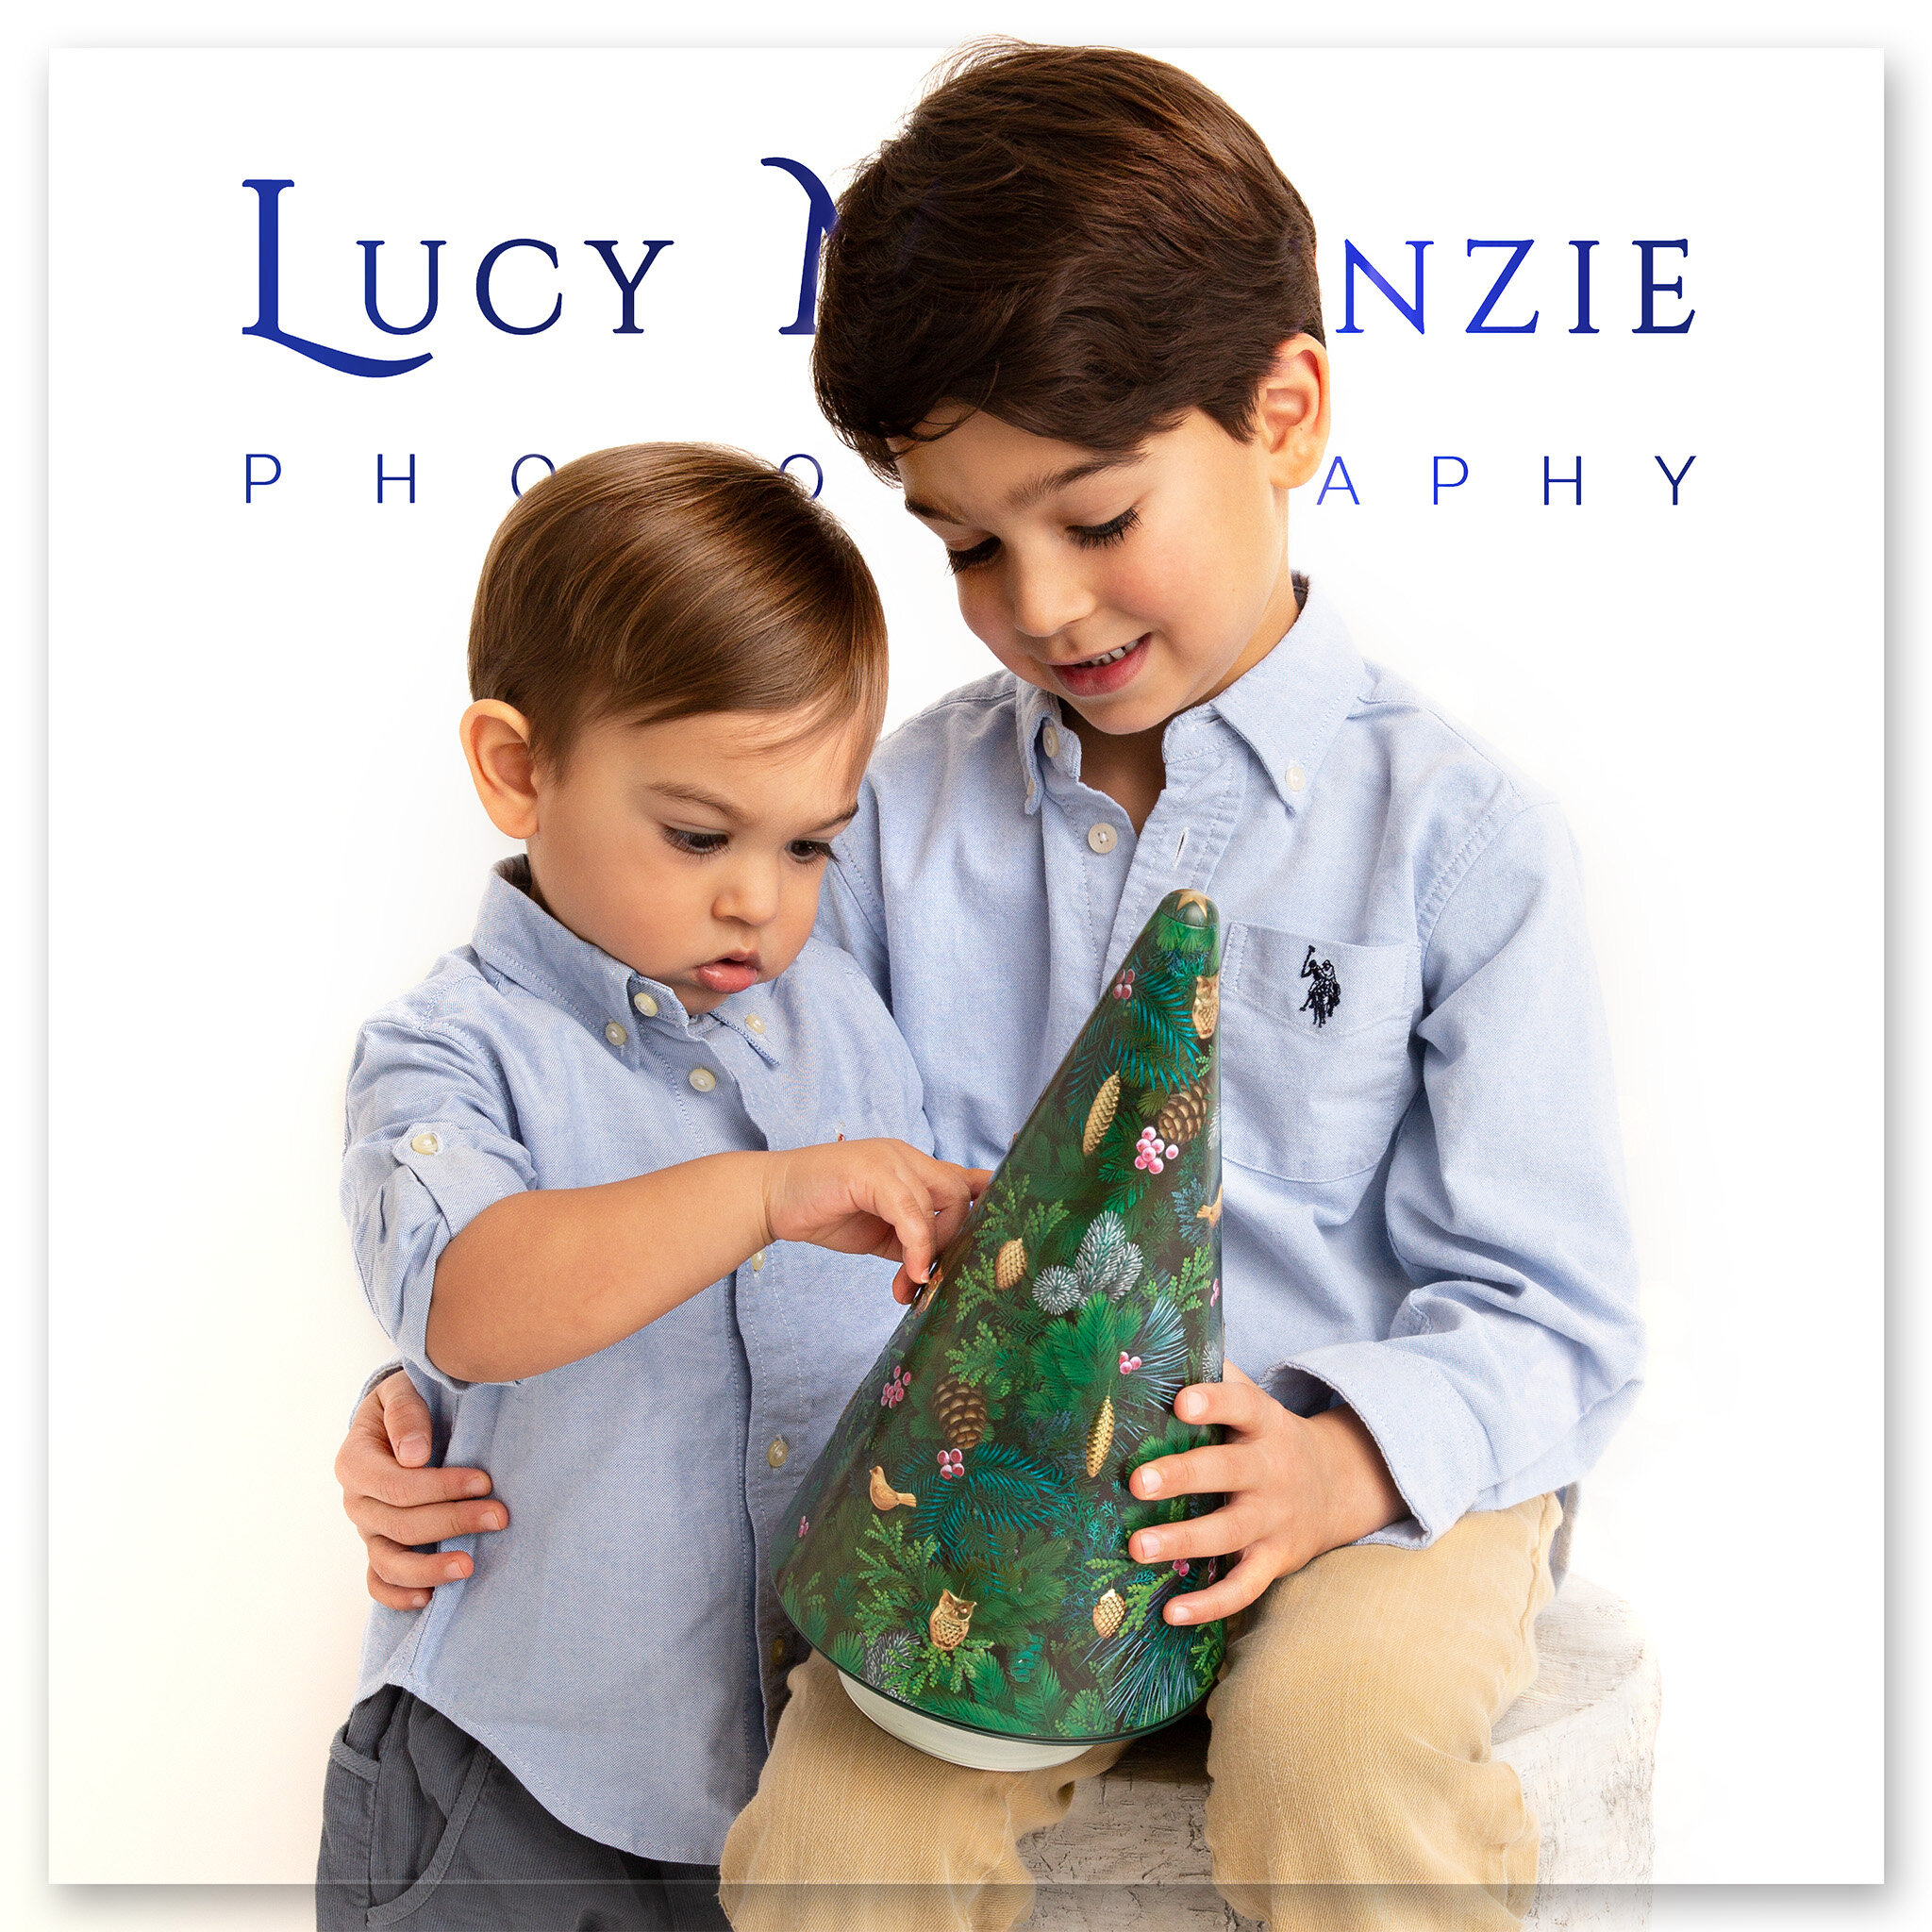
COME AND HAVE YOUR CHRISTMAS PORTRAITS TAKEN
I know this post is full of all things Halloween, but in between eating pumpkin soup and making creepy crafts, why not find those fabulous Christmas jumpers, dust off the fur-trimmed Santa hats, don the sparkliest of party dresses and come to the studio for some festive fun!
This session will be a real celebration of your child at this moment of their lives, as these photographs will capture their unique features beautifully, with a few festive props to help create the excitement and wonder of Christmas. They make perfect presents for partners or doting grandparents as all my packages include printed and mounted 10"x8” photographs.


MAKE YOUR CHRISTMAS CAKE
Being a teacher, my mum always made her cake and Christmas puddings during half term, as she had more time to enjoy the process and the hours at home to dedicate to steaming those many puddings! The tradition has stuck with me too. We’ve given Mary Berry’s Classic Fruit Cake a try this year… what’s your favourite recipe?
Don’t forget to make a wish as your stir….
If you’ve made it to the end of this list, then hopefully you’ve got lots of ideas to go and try… let me know which ones you enjoyed and if there is anything you will definitely be giving a go this half term.
Happy half term!

PS - a lot of parents have been in touch recently as they just received the proofs of photographs taken of their children at school this term, and have been hugely disappointed. If you have also received shockingly bad photos, do get in touch as I will be running some extra School Mini Sessions to make sure that everyone can have beautiful photographs that they love and are proud to share, rather than fill them with horror and embarrassment!